This was originally an article I wrote for the SadConsole wiki in 2019, which I have moved over to this blog. You can find (and use) SadConsole here.
Sometimes you may want to apply a shader or graphical effect to your game when drawing, which this article will explain how to do.
To apply a post processing effect to the screen, you can override SadConsole’s default drawing functionality, and then apply your own custom draw commands.
To do this, you attach a new DrawableGameComponent to SadConsole’s game instance components, which is set to draw after SadConsole has finished creating the frame for the default screen.
This DrawableGameComponent should then access SadConsole’s final render surface, and apply whatever custom draw code is needed.
Method
Setting up the Class
To begin with, you’ll need to create a new class that inherits from MonoGame’s DrawableGameComponent, and override the constructor and “Draw” functions so that you can draw to screen.
1
2
3
4
5
6
7
8
9
10
11
12
13
public class MyCustomPPFX : DrawableGameComponent
{
    public MyCustomPPFX() : base(SadConsole.Game.Instance)
    {
        //...
    }

    //When we need to draw to the screen, it's done here.
    public override void Draw(GameTime gameTime)
    {

    }
}
After this, you’ll need to have your constructor load in the shader you want to use. This can be done through two methods:
- The MonoGame Content Pipeline
- 2MGFX (Manual Inclusion)
The MonoGame Content Pipeline is arguably easier, however requires you to have the pipeline available for changes.
Loading a Shader
Method 1: MonoGame Content Pipeline
To load your content via. the MonoGame Content Pipeline, you can create a simple .mgcb and include the shader as a file. Once this is done, you can set up a content manager and load the shader like so:
1
effect = Content.Load<Effect> ("myEffect");
Method 2: 2MGFX and Manual Inclusion
First, you’ll need to compile your .fx shader using 2MGFX, a free tool included in every MonoGame install. The default location for this is in the MonoGame MSBuild folder, located at Program Files (x86)\MSBuild\MonoGame\Tools.
Note: Make sure you’re compiling for the correct platform, either DesktopGL or DirectX_11, otherwise your shader will not compile properly, or fail to load.
Once this is done, you can include the compiled file as a resource in your assembly, as is done so here, and then load the effect from raw bytes, like so:
1
Effect myEffect = new Effect(SadConsole.Global.GraphicsDevice, Resources.MyEffect);
Configuring the Class
Once you’ve successfully loaded the shader in your constructor, it should look something like this:
1
2
//Load the shader into memory.
myShader = new Effect(SadConsole.Global.GraphicsDevice, Resources.MyShader);
Now you need to set the draw order of your DrawableGameComponent to be 6 or higher, so it draws after SadConsole’s finished doing its rendering.
1
2
3
4
5
//Set the draw order to 6, so we draw AFTER SadConsole.
DrawOrder = 6;

//Load the shader into memory.
myShader = new Effect(SadConsole.Global.GraphicsDevice, Resources.MyShader);
With the DrawOrder properly set, all that’s left to do is configure the shader’s parameters, and then include the Draw code. The first step is done on a shader-by-shader basis, however this is what the code looks like in the SadConsole Shader Example:
1
2
3
4
5
6
7
8
9
10
public override void Draw(GameTime gameTime)
{
	// Respect the draw flag for sadconsole
	if (Settings.DoDraw)
	{
		spriteEffect.Parameters["textureSize"].SetValue(new Vector2(Global.RenderOutput.Width, Global.RenderOutput.Height));
		spriteEffect.Parameters["videoSize"].SetValue(new Vector2(Global.RenderOutput.Width, Global.RenderOutput.Height));
		spriteEffect.Parameters["outputSize"].SetValue(new Vector2(Global.RenderRect.Width, Global.RenderRect.Height));
	}
}
You’ll need to configure any static values for your shader in your constructor after you’ve loaded it, as well. Finally, the Draw code. First you begin the rendering of the SpriteBatch, apply your shader, draw the spritebatch, and then end. Here’s an example of that, again from the example:
1
2
3
4
5
6
7
Global.SpriteBatch.Begin(SpriteSortMode.Immediate, BlendState.NonPremultiplied, SamplerState.PointClamp, DepthStencilState.DepthRead, RasterizerState.CullNone);

//Apply the shader before draw, but after begin.
spriteEffect.CurrentTechnique.Passes[0].Apply();

Global.SpriteBatch.Draw(Global.RenderOutput, Global.RenderRect, Color.White);
Global.SpriteBatch.End();
Adding the Component
Now that your custom renderer is completely set up, you can add it as a component to the game instance. Somewhere in your SadConsole initialization code, you can add an instance of your class to the SadConsole.Game.Instance.Components collection.
1
Game.Instance.Components.Add(new MyCustomPPFX());
Running the game, your shader should now be applied, permitting your parameters and configuration were correct.
Troubleshooting
I’m just seeing a black screen, what should I do?
Has the shader been applied between the Begin and Draw methods? Is the shader broken?
Another possible issue is the parameters of the shader. Make sure any size or output parameters are set in the Draw function, and based on SadConsole’s actual dimensions. Also make sure that your static properties are configured properly.
We all have the same issue; Should I clip all my props? Won’t it make players annoyed and cause frustration when something that looks like it should be wallbang enabled/walkable is not?
The answer to the first: Yes. The answer to the second: Yes.
There’s a compromise to be made here, one that a lot of mappers struggle to find a balance between. For a great example, look at Valve’s maps, especially fine polished ones such as Dust2. These take a more balanced approach to clipping, as well as employing some clever techniques to make the clipping as smooth and unnoticeable for the player as possible, such as at the stairs leading to B.
This isn’t without it’s issues, obviously, so don’t take these to be the holy grail of proper clipping, as you can still get stuck at specific points on the map, but it’s a good general practice to follow. The two easy ones are as follows:
- Clip areas that need to be smoothed out.
- Clip areas where the bomb could get stuck, such as in small corners or areas behind crates.
However, a more contentious example would perhaps be the idea of:
- Clip areas that the player isn’t meant to reach.
You may think that this is extremely simple, but in reality it can be a major sticking point for players. The reasoning behind this is, as mentioned before, if it looks like you should be able to go to an area, at least one player will attempt it. This is something more prominent map makers have had trouble with too, 3kliksphilip more recently having issues with this in his “de_sparity” map, in which a platform looked like it should have been accessible, which eventually marked down his map. How unfortunate.
It’s even present on Valve’s own map, Canals, in which a knee high fence prevents you from walking further, seen in the below image.

Fixing this is more difficult on different maps, such as situations where you can’t just stick in a massive wall, which I’m assuming was the reason for de_canals’ suspiciously absent barriers.
To conclude, you should clip everything to keep the gameplay smooth for the player, and avoid exploits such as boosting and bomb stuck spots, but only when it makes sense for your map. Don’t go adding a clipping wall over a 32 unit high box. It’s all really common stuff, but it takes a lot of work to get right, as evident in the Valve maps that have been worked on for years on end that still aren’t perfect.
Happy clipping.
Storing booleans is an odd topic for the programming world, specifcally for storage. Typically, the smallest addressable chunk of memory is a byte, or 8 bits. The boolean type, having two states, requires just a single bit. This causes the following dilemma: If I want to store 8 bools, why am I using 8 bytes? That’s 64 bits, 56 more than I actually need to store that amount.
1
2
3
4
5
6
7
8
9
//What a waste of storage!
bool option1 = true;
bool option2 = true;
bool option3 = true;
bool option4 = true;
bool option5 = true;
bool option6 = true;
bool option7 = true;
bool option8 = true;
C++, thankfully, has a way to fix this issue. Namely, through using 1 byte, with each individual bit in said byte being a boolean on it’s own. There are two methods to do this, one being much easier than the other, but I’ll explain both so that it becomes obvious what’s happening.
The Manual Method
In C++, you can create 8 booleans in a byte by using Bitwise comparisons. So, let’s initialize some options.
1
2
3
4
5
6
7
8
int optionOne = 0b0000'0001;
int optionTwo = 0b0000'0001;
int optionThree = 0b0000'0001;
int optionFour = 0b0000'0001;
int optionFive = 0b0000'0001;
int optionSix = 0b0000'0001;
int optionSeven = 0b0000'0001;
int optionEight = 0b0000'0001;
You may be thinking: “This takes up loads of storage, why would I use this instead of 8 booleans?”. Well, in terms of using a single set of 8, yes it does, however if you’re creating many instances of, for example, an enemy, which all have different possible status effects, this method is much more space-efficient than others. But, we’ll get to that later.
Now that all the options are initialized, you can create a “char” which we’re really just going to use to store binary data.
1
char options = 0;
This is where it all comes together. Bitwise comparisons can set specific bits on and off, using the options variables that we just created earlier. So, if you use Bitwise OR:
1
options |= option1;
What’s really happening is this:
1
2
3
4
options: 0000 0000
option1: 0000 0001
------------------
options: 0000 0001
It compares the two bytes, and if any of the bits are on in either of those bytes, they are turned on in the result. For example, this would be the result of another two random bytes:
1
2
3
4
byte1: 1010 1100
byte2: 0001 1110
----------------
outpt: 1011 1110
This means that Bitwise OR can be used to turn our individual “booleans” on. How would you disable them? Another Bitwise operator, Bitwise AND, and the inversion of the option we’re turning off.
1
options &= ~option3;
How it works:
1
2
3
4
 options: 0000 0100
~option3: 1111 1011
-------------------
 options: 0000 0000
Bitwise AND only produces an output of 1 on a bit when both bits in both of the input bytes are on. By using the inverse of the option (done by the key symbol tilde), this ensures that all other options that were enabled stay enabled, but the selected one to be deactivated will 100% of the time be turned off. Again, here’s another example.
1
2
3
4
bool1: 1001 0110
~bool: 1110 1111
----------------
outpt: 1000 0110
This is similar to how a bit mask works, but I’ll follow that up in another post. Finally, to compare whether a bool is on or not, you can simply use a Bitwise & with the normal option to check if it’s + or 0, and then use a static cast to make it a boolean, like so:
1
2
3
if (static_cast<bool>(option & option4)) {
	std::cout << "Hey, option 4 is on!\n";
}
But there’s a much easier way to do this, that doesn’t require fiddling around with raw binary values. This was more just a way to understand it than how it should actually be implemented. Here’s the real, built-in method, provided by C++’s standard library.
The std::bitset Method
This method requires the use of a library, but is arguably much better. To start, import the bitset library from system.
1
#include <bitset>
Once this is done, you can use std::bitset
Remember to include <iostream> if you’re planning to output text like in these examples, and follow good practice by leaving out using std.
1
2
3
4
5
6
7
8
9
std::bitset<8> options;
options.set(8); //Turns the 8th bit on.
options.reset(8); //Turns the 8th bit off.
options.flip(8); //Flips the 8th bit.
options.test(8); //Tests if bit 8 is on, returns an int.

if (static_cast<bool>(options.test(8))) {
	std::cout << "Static casting allows for use in IF blocks.\n";
}
That’s much easier, right? So, now you know the mechanics of how it works, and the bit-level inputs required, go check it out.
Thanks for reading!
I no longer agree with this article, but am keeping it here as a reminder. As you can tell, I was a bit frustrated. What I do still agree with, though, is the NodeJS dependency stack is absolute hell.
When working on a project recently, I was required to do some networking to communicate between the C#.NET application I was creating, and a remote online server. Sounds pretty easy, right? Well, I’d been thinking about a couple of solutions, when I remembered an easy networking solution called Socket.IO (which you can check out here). Unfortunately, this program was native to NodeJS, and wasn’t available for a C# application, which sucked.
After a little searching, however, I found a C#.NET wrapper for the program, which could be installed by Nuget in VS2015 natively! It’s a great compatibility fixer, and you can find it on Quobject’s Github page 1. So, I set to work creating the client in C#, and the server in NodeJS. The syntax for both of them is remarkably similar, and after some tweaking from the Github example scripts, I managed to get this:
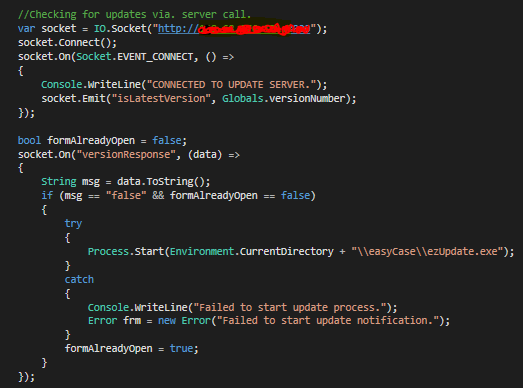
Obviously the server address is censored, but the logic of the script should still be pretty clear.
It connects to the server, and then sends an “isLatestVersion” request to the server, along with the current version number of the program, and waits for a response. When it gets one back, it checks whether the value is false, and if it is, starts the update program.
However, there was a caveat with this system. The windows form that handled the updating used a third party Node package designed for use with Socket.IO, called “delivery”. It was made by primarily the same developers, and based on the newest version, and was labelled as “fully compatible” with C#. This is where the lesson comes in:
Don’t use wrappers if you are going to use third party packages.
It’s one or the other, is the point. Because, as soon as that happened, everything completely exploded 2. Blunt, but true. When using the package, I first noticed that it used an automatically executing asynchronous function, which immediately raised red flags, as C#’s wrapper doesn’t like that at all, from previous testing. When running it, sure enough, it spat out that the variable “window” wasn’t assigned in the async function call, as it was coming from a C# source, which doesn’t have a window property. This kind of left me in a bad place, so I removed the asynchronous function and window variable from the package entirely, and used C#’s native systems instead.
This only created more problems, as the incompatibilities that I couldn’t see before were now unearthed, grisly and disgusting, for all the world to see. First, an error involving the “Delivery()” constructor used in my actual native NodeJS script broke, which was likely due to my meddling with the window function, however was fixed by a thorough crawl through the documentation and package source files, and a quick change in the script from using “var delivery = new Delivery()” to “var delivery = delivery.connect(ip, apic, {reconnect:true/false})”. Much uglier, but still functional. Then, an error surfaced to do with MIME, one of the package’s dependencies, and entirely unrelated to my project. At this point, I was getting a little tired, but soldiered on to try and fix the error.
After some research into the error code I received, it appeared that another package entirely, Knox, was causing this error, one of MIME’s dependencies! This is when I learned my lesson. When a third party package is ported over to another language, all it’s dependencies have to be as well. This creates an inconceivable number of errors if they aren’t all properly ported with identical syntax, and digs a very deep rabbit hole from which it’s nearly impossible to crawl out of.
I eventually did fix the cross compatibility issue, but only by contacting the developer via. a pull request and actually changing the code of the package itself to support a lower MIME version with the command! In my opinion, that was more stress than using a more complicated networking solution, but having little errors due to native compatibility.
I’m never using a wrapper and third party tools together ever again. Thanks, and adieu.
Over the past couple of months, apart from writing my book, “You Suck at Programming” 1, I’ve been working on an emulator/interpreter for the famous computer simulation “Little Man Computer”, by Peter Higginson. It was created many years ago to help students learn about how the CPU and memory worked and interacted with each other, and was a great way for me to try and understand some lower level emulation, as it has an instruction set consisting of just nine operations. These operations are:
1
2
3
4
5
6
7
8
9
ADD – Addition
SUB – Subtraction
DAT – Data Storage
LDA – Load Data
STA – Store Data
HLT – Halt Program
BIZ – Branch if Zero
BRA – Branch Always
BZP – Branch if Zero or Positive
They all sounded fairly simple to implement, so I went about creating the first prototypes for the interpreter of this program. Initially, I tried to create a dictionary with 99 data spaces to store my data, however this ended up causing a lot of problems for me down the line. I eventually had to scrap the entire idea, and ended up just using a simple two dimensional array. Now that that was sorted, I needed to somehow get a standard data format including data and addresses, and have an interpreter read them properly. Luckily, Little Man Computer is close enough to a real computer that it uses “opcodes”, small (in this case 3 character) strings which tell you which command is being executed, and at what address. So, the format I came up with looked like this:
1
[[00, 901], [01, 105], [02, 902]]
The 2D array contains in the first position the address of the current memory slot (ascending from 00), and in the second position the opcode of the command. “901” is input, and “902” output, with “1” being addition, and “5” being the address that is added to the accumulator’s current value (which is what the ADD command actually does, but more on the accumulator later). So, by that definition, this program just takes an input, adds the value of address 5 to it, and spits out the answer.
I then realised that I needed some way of storing the value of the accumulator, program counter, and all the other registers within the LMC CPU. So, I just used basic integers. Simple.
The interpreter I wrote has a chain of decoding that it has to complete before it reaches the “execution” part of “fetch, decode, execute”. The fetching has already been done in the form of the two dimensional array, and the decoding is the fun bit. The interpreter loops through each value in the array, checking the memory slot’s second position for the opcode, and one by one executing the commands. If a branch is found to be true, then the interpreter loops through all positions in the two dimensional array until the first position’s value matches the last two characters of the branch (like 804, which would search for address “04” if the value was positive or zero). The code will then continue from that location until a halting operation (HLT).
For this, however, I had to create an essentially entirely new file format called “Little Man Script, or .LMS. I’ve included a compiler in the project that allows you to convert plaintext commands (like “LDA 04” or “STA 99”) into a formatted “.LMS” file which you can run with either the executable file or the raw Javascript.
To see this in action for yourself, and to try writing an assembly script on your own (you can use the provided compiler to convert text files) navigate to my GitHub page by clicking here, and downloading a zip of all the files in the source.
That’s all for now, but I’ll catch up with you soon when the book is nearer to release.
-
This book was later renamed to “Programming at Light Speed”. ↩